Adding authentication
In the previous chapters we created our Feathers chat application and initialized a service for storing messages. We also build a simple real-time frontend for the browser. However, for a proper chat application we need to be able to register and authenticate users.
Generating authentication
To add authentication to our application we can run
feathers generate authentication
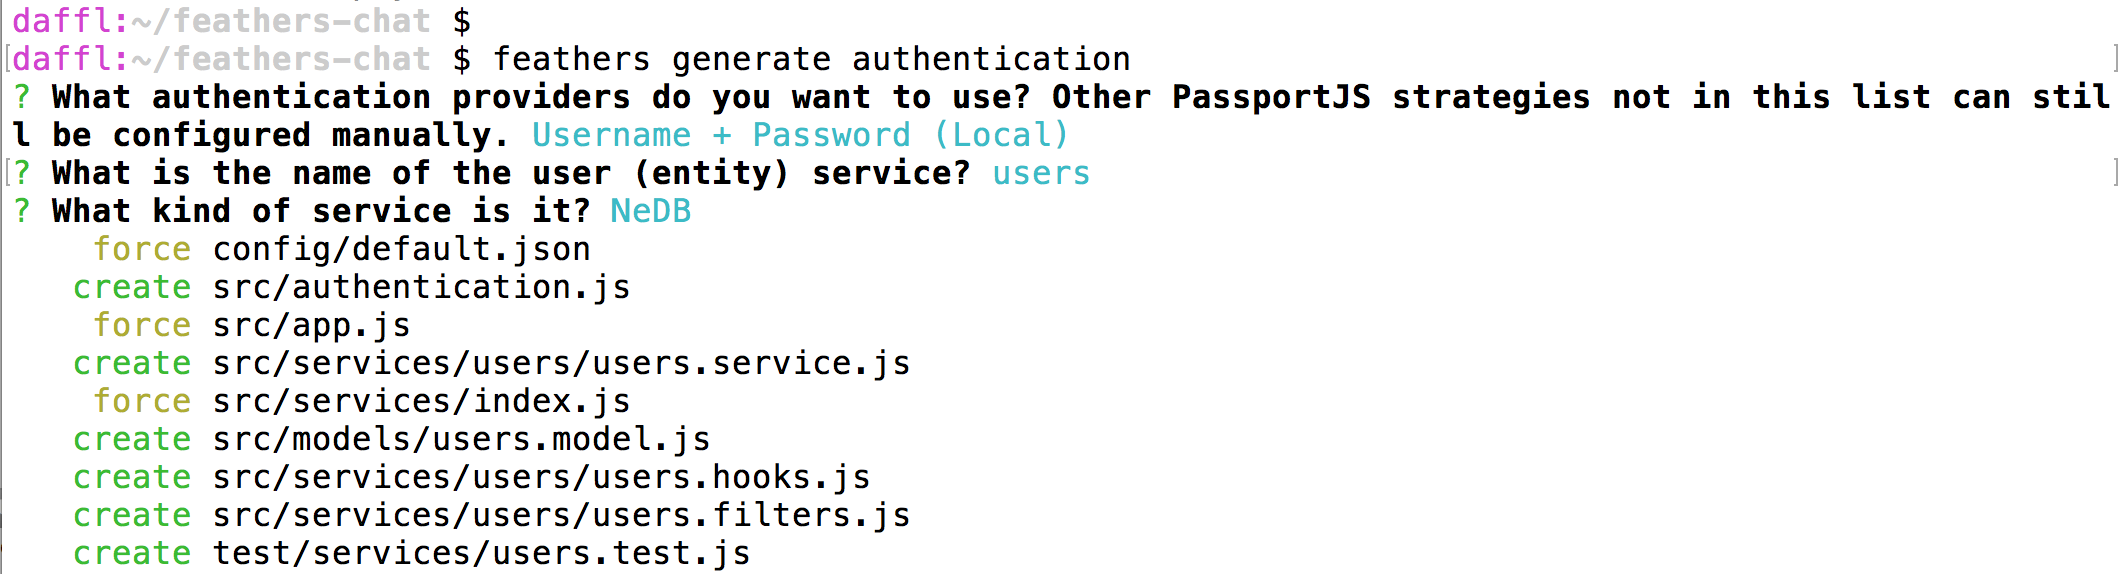
This will first ask us which authentication providers we would like to use. In this guide we will only cover local authentication which is already selected so we can just confirm by pressing enter.
Next we have to define the service we would like to use to store user information. Here we can just confirm the default users and the database with the default NeDB:
Creating a user and logging in
We just created a users service and enabled local authentication. When restarting the application we can now create a new user with email and password similar to what we did with messages and then use the login information to get a JWT (for more information see the How JWT works guide).
Creating the user
We will create a new user with the following data:
{
  "email": "feathers@example.com",
  "password": "secret"
}
The generated user service will automatically securely hash the password in the database for us and also exclude it from the response (passwords should never be transmitted). There are several ways to create a new user, for example via CURL like this:
curl 'http://localhost:3030/users/' -H 'Content-Type: application/json' --data-binary '{ "email": "feathers@example.com", "password": "secret" }'
With a REST client, e.g. Postman using this button:

Or via the client we used in the frontend chapter by adding the following to public/app.js:
// Create a test new user
client.service('users').create({
  email: 'feathers@example.com',
  password: 'secret'
});
Note: Creating a user with the same email address will only work once and fail when it already exists in the database.
Getting a token
To create a JWT we can now post the login information with the strategy we want to use (local) to the authentication service:
{
  "strategy": "local",
  "email": "feathers@example.com",
  "password": "secret"
}
Via CURL:
curl 'http://localhost:3030/authentication/' -H 'Content-Type: application/json' --data-binary '{ "strategy": "local", "email": "feathers@example.com", "password": "secret" }'
With a REST client, e.g. Postman:
The returned token can now be used to authenticate the user it was created for by adding it to the Authorization header of new HTTP requests.
The Feathers client from the frontend chapter already has authentication (and storing the generated token in LocalStorage) built in and can be used by adding this to public/app.js:
client.configure(feathers.authentication({
  storage: window.localStorage
}));

client.authenticate({
  strategy: 'local',
  email: 'feathers@example.com',
  password: 'secret'
}).then(token => {
  console.log('User is logged in');
});
Then we can update public/app.js to look like this:
const socket = io();
const client = feathers();

// Create the Feathers application with a `socketio` connection
client.configure(feathers.socketio(socket));

// Get the service for our `messages` endpoint
const messages = client.service('messages');

// Configure authentication
client.configure(feathers.authentication({
  storage: window.localStorage
}));

client.authenticate({
  strategy: 'local',
  email: 'feathers@example.com',
  password: 'secret'
}).then((token) => {
  console.log('User is logged in', token);

  // At this point we have a valid token, so we can fetch restricted data.
  messages.find().then(page => page.data.forEach(addMessage));
  messages.on('created', addMessage);
});

// Add a new message to the list
function addMessage(message) {
  const chat = document.querySelector('.chat');

  chat.insertAdjacentHTML('beforeend', `<div class="message flex flex-row">
    <img src="https://placeimg.com/64/64/any" alt="${message.name}" class="avatar">
    <div class="message-wrapper">
      <p class="message-header">
        <span class="username font-600">${message.name}</span>
      </p>
      <p class="message-content font-300">${message.text}</p>
    </div>
  </div>`);

  chat.scrollTop = chat.scrollHeight - chat.clientHeight;
}

document.getElementById('send-message').addEventListener('submit', function(ev) {
  const nameInput = document.querySelector('[name="name"]');
  // This is the message text input field
  const textInput = document.querySelector('[name="text"]');

  // Create a new message and then clear the input field
  client.service('messages').create({
    text: textInput.value,
    name: nameInput.value
  }).then(() => {
    textInput.value = '';
  });
  ev.preventDefault();
});
Securing the messages service
Now we have to restrict our messages service to authenticated users. If we run feathers generate authentication before generating other services it will ask if the service should be restricted to authenticated users. Because we created the messages service first, however we have to update src/services/messages/messages.hooks.js manually to look like this:
const { authenticate } = require('feathers-authentication').hooks;

module.exports = {
  before: {
    all: [ authenticate('jwt') ],
    find: [],
    get: [],
    create: [],
    update: [],
    patch: [],
    remove: []
  },

  after: {
    all: [],
    find: [],
    get: [],
    create: [],
    update: [],
    patch: [],
    remove: []
  },

  error: {
    all: [],
    find: [],
    get: [],
    create: [],
    update: [],
    patch: [],
    remove: []
  }
};
This will now only allow users with a valid JWT to access the service.
What's next?
In this chapter we initialized authentication and created a user and JWT. We can now use that user information to process new message data.